In this article:
Before you start
- To send mailings from a specific email address, you must first add it to your list of sender addresses and validate it. Learn how >
- It's only possible to activate a custom DKIM signature for addresses that have a business domain that you control, i.e., a domain personalized to your organization (e.g., info@thenameofyourcompany.com). If you use a free email address such as Gmail, Hotmail or Yahoo (e.g. mycompany@gmail.com), you won't be able to activate the custom DKIM authentication, and we'll provide you with a temporary address for your mailings. This ensures that your email is correctly authenticated, and that it is not rejected by Gmail or Yahoo. Find out why it's not recommended to use a free email address for your mailings >
Temporary email address: This address will be generated from your sender address, e.g., if your email address is mycompany@gmail.com, your sending address will be mycompany.gmail.com@email.cyberimpact.com (or .net).
- Please note that the steps below require access to your DNS (Domain Name System). If you can't access them, or don't know how, you can simply copy and paste the instructions you'll find in your account and send them to the person or company who manages your domain name. This is a routine operation which is usually relatively simple for them to carry out. How to obtain a copy of the instructions to authenticate your domain >
How to authenticate your mailings
In order to be able to use your email addresses to send your mailings from our platform and ensure that their sending domains are correctly authenticated, you must:
- Authenticate your sending domains with a DMARC policy. Learn more about DMARC configuration >
- Create a CNAME in your DNS records for each of the domains and subdomains you use for your mailings.
How to
- Go to .
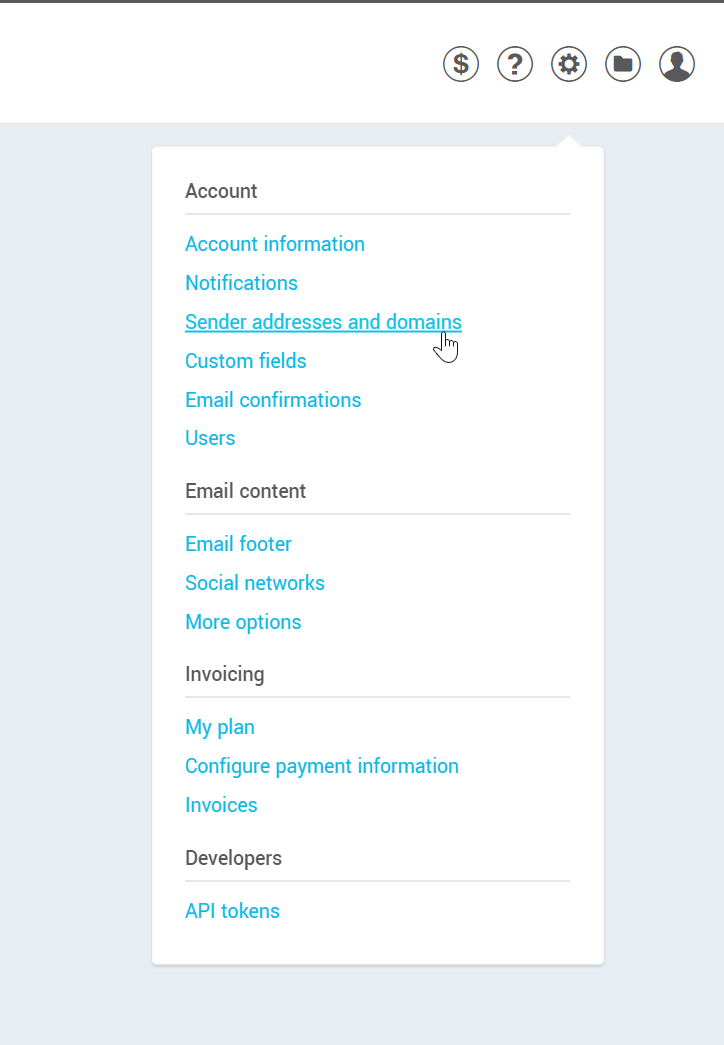
- Make sure you have added to your list of sender addresses an address with the domain name you wish to authenticate for your mailings.
If not, click on the + Add button at the top right of the page. Next, enter the email address you wish to use for your mailings. A validation email will then be sent to this address. This message contains a clickable button that will allow us to confirm that you are the owner.
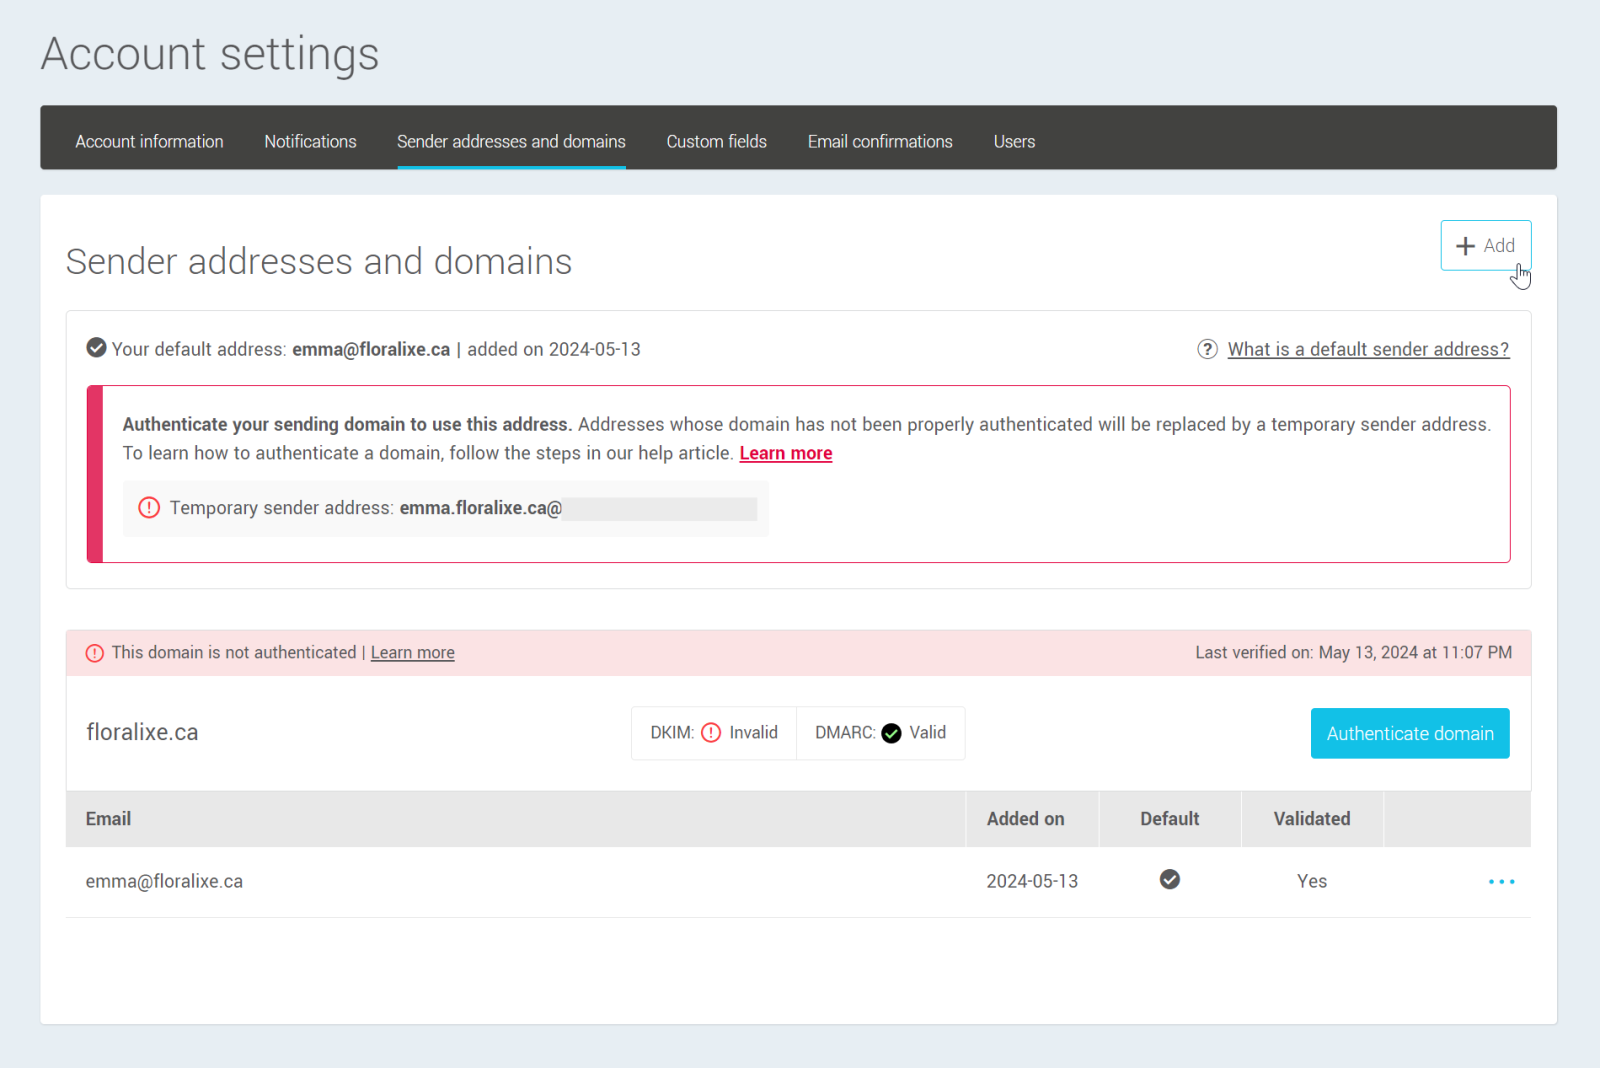
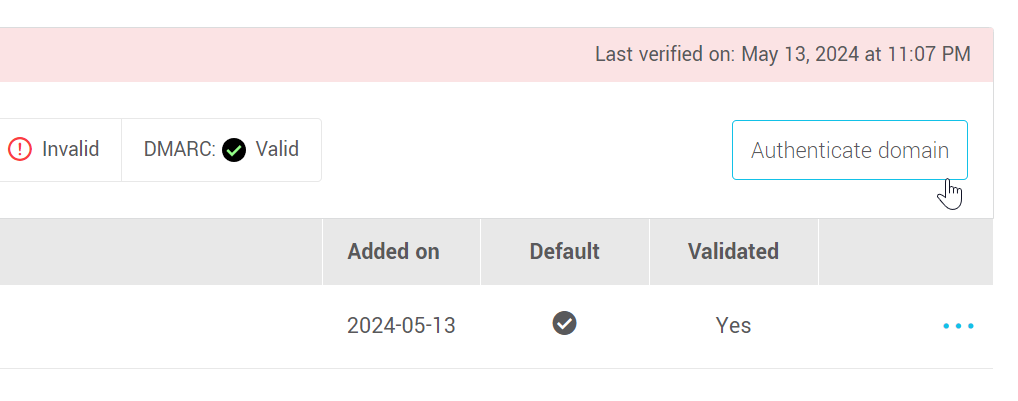
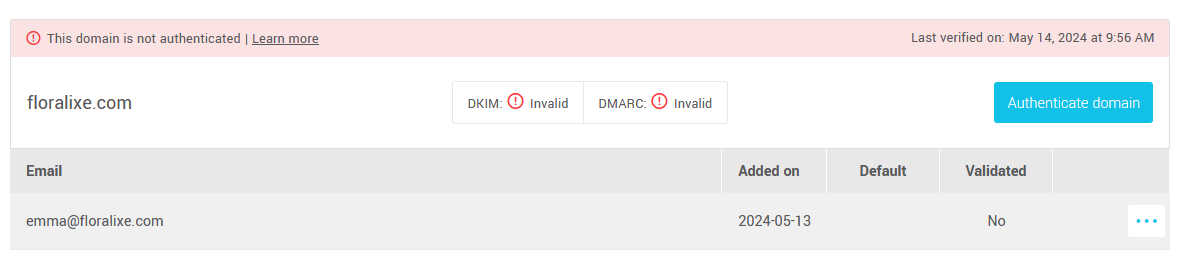
- Then locate the address and domain to be authenticated on the page. Click on the Authenticate domain button to the right of the domain.
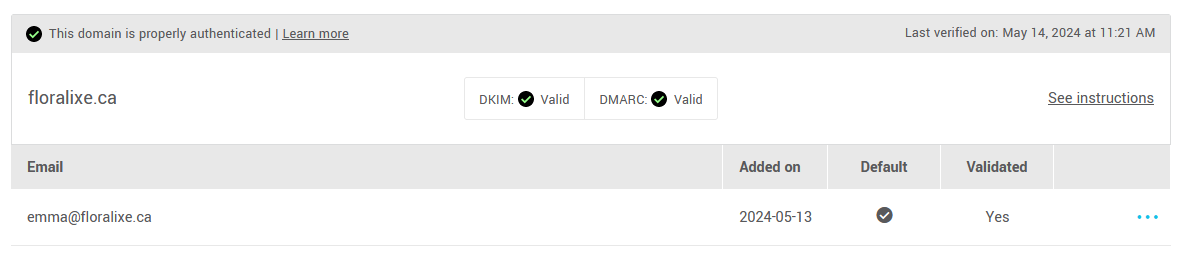
Note: To use an address for your mailings without it being replaced by a temporary address, its domain must have a valid status for both DKIM and DMARC. If you don't have two valid statuses, it's because some steps are missing to enable us to authenticate your mailings.
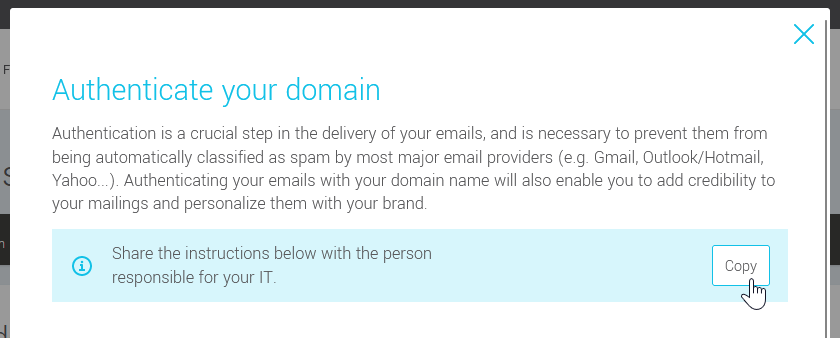
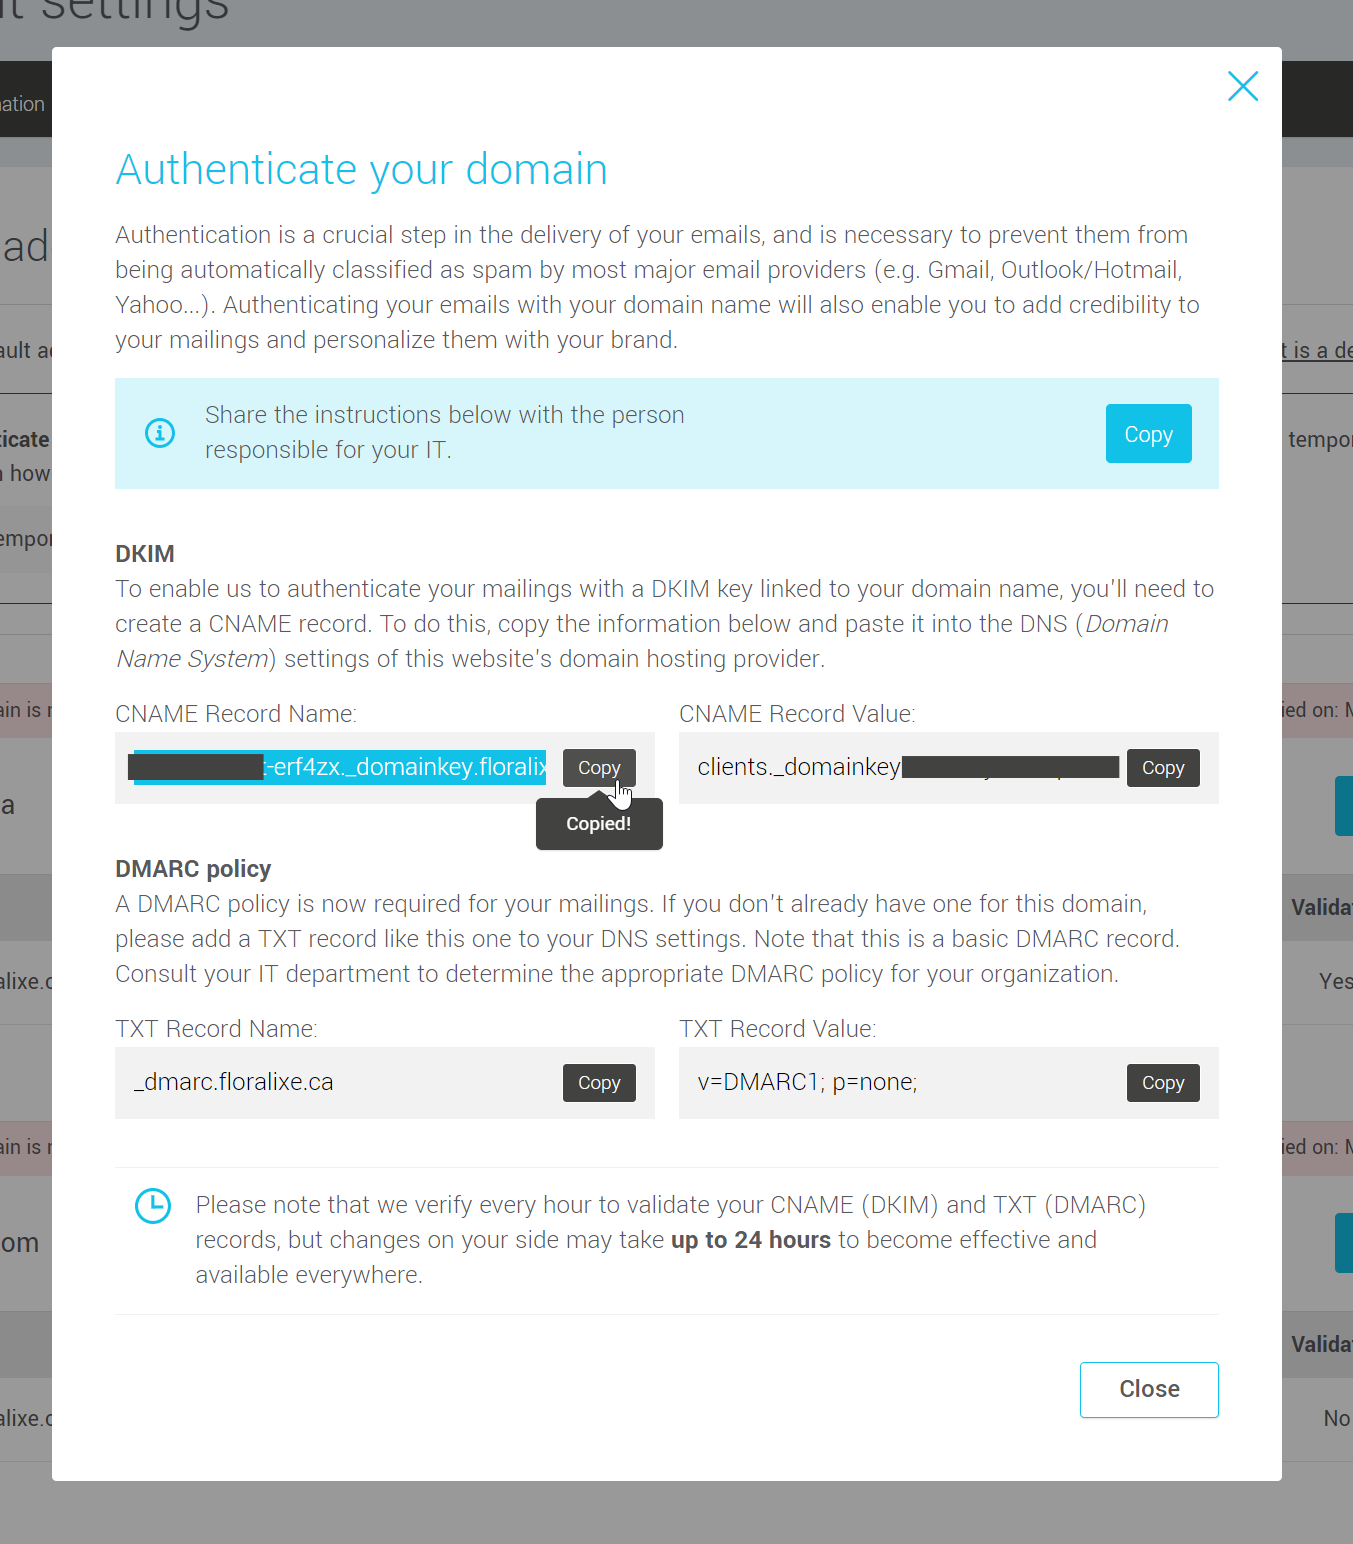
- If you are not the person who will be making the changes to your DNS, click on the Copy button to the right of Share the instructions below with the person responsible for your IT. This is a pre-formatted email containing complete instructions for your hosting provider or IT team to make the changes for you. All you have to do is paste the text into a message and send it to them. Once you've made the changes, come back to the sender address page awhile later to see if they've been applied. If so, you'll now see a valid status (check mark icon) next to DKIM and DMARC in the domain box.
If you are the person who will be making the changes to your DNS, in the DKIM section, copy the name of the CNAME record and go on to the next step.
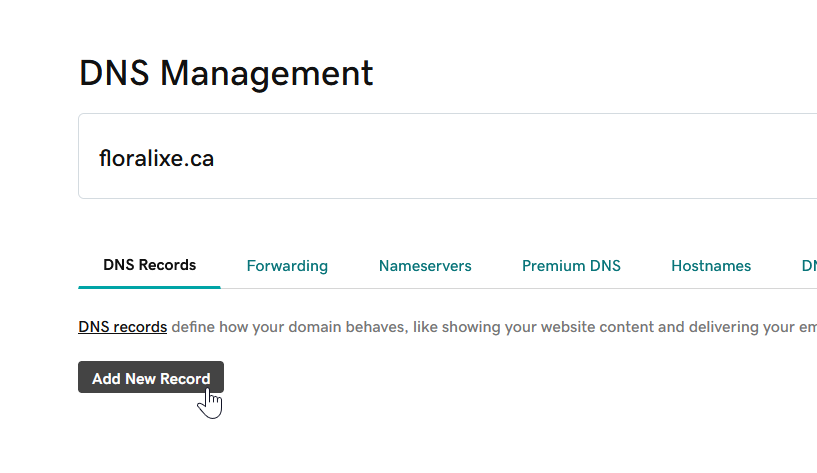
- In another browser window, open the tool you use to manage your DNS.
Example from GoDaddy :

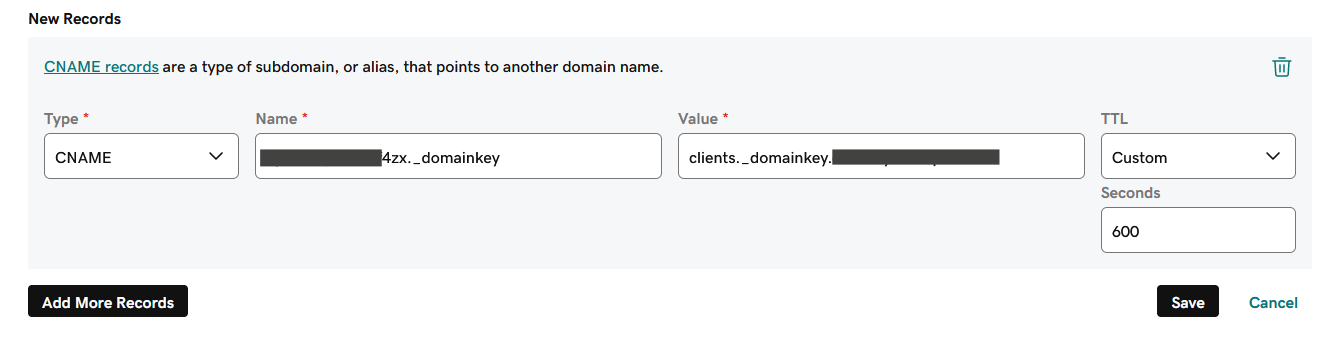
- Add a new CNAME record. In the Record name field, paste the CNAME name you have previously copied into your account.
.png)
- Go back to the domain authentication instructions in your account and copy the value of the CNAME record. Then go to your DNS management tool and paste the value into your new record.
In your account:

Example from GoDaddy:
- Save changes.
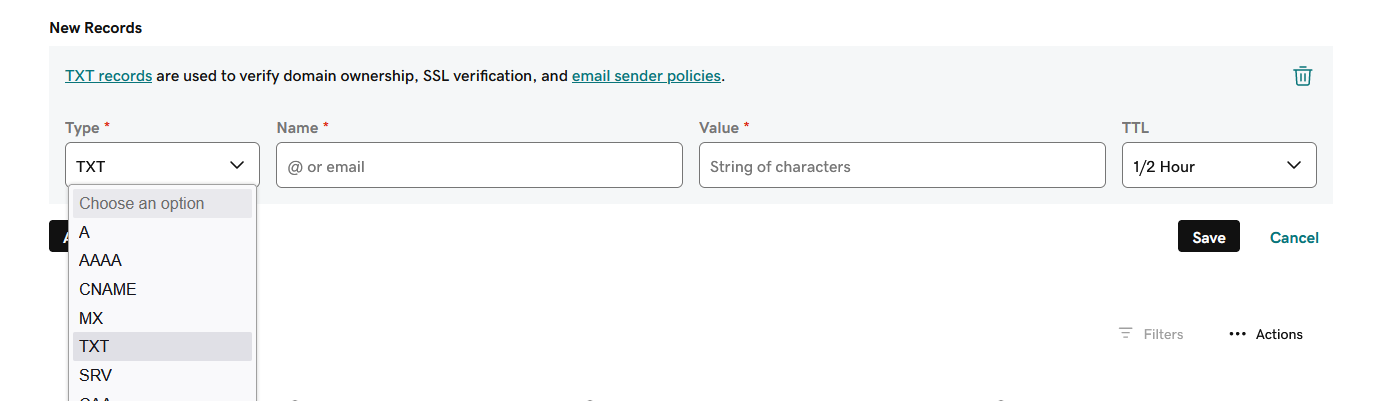
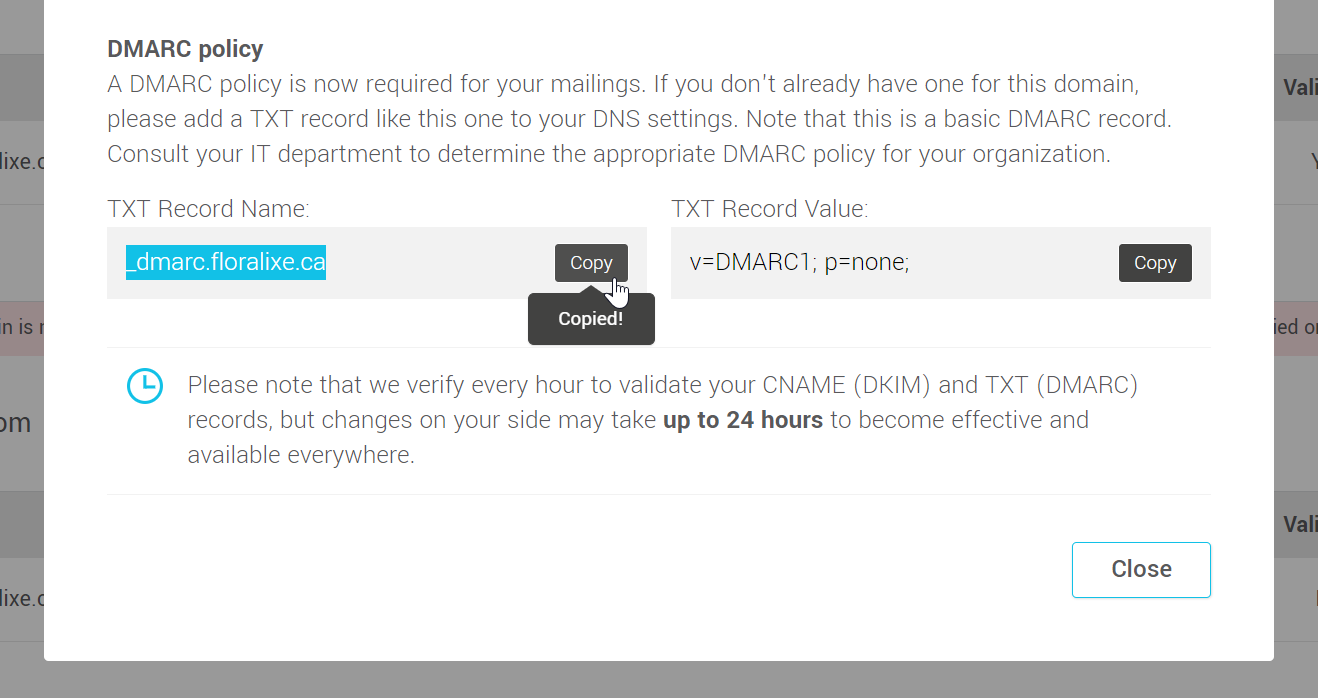
- If you don't have a DMARC policy in place for your domain name, you'll need to create a second record in your DNS. Choose TXT as the record type.
Example from GoDaddy:
- To create this record, you can use the instruction suggested in the authentication instructions window. Copy the record name and value in the DMARC instructions section and paste them into the appropriate fields of your new TXT record.
In your account:
Example from GoDaddy:
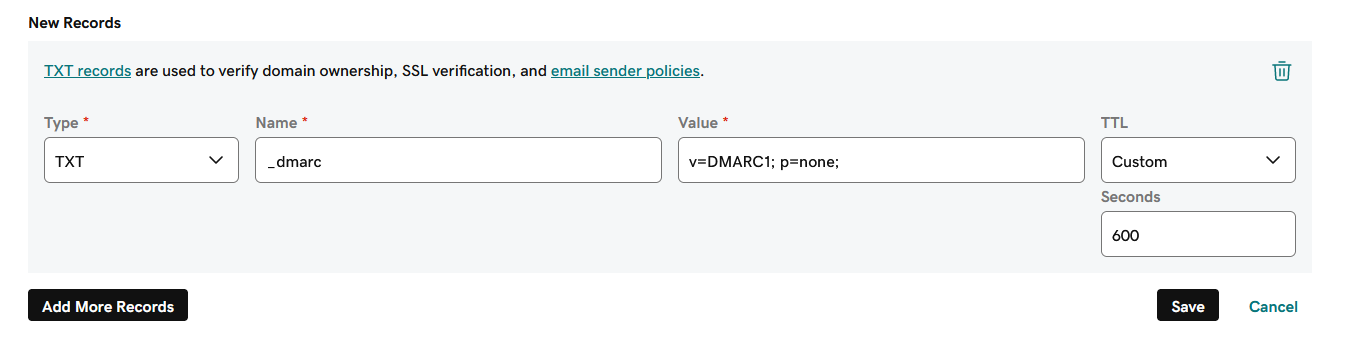
- If desired, reduce the TTL value of your TXT record to the minimum and save your changes.
- Now all you have to do is wait, and come back later to check that we've detected your new records. The domain is correctly authenticated when you have a valid status (check mark icons) next to DKIM and DMARC. When this is the case, you can then use this domain's sender addresses without it being replaced by a temporary address at the time of sending.
How to obtain a copy of the instructions to authenticate your domain
Here's how to retrieve instructions to ensure that your website's domain is correctly authenticated for your mailings.
- Go to .
-
Click on the Authenticate domain button.
If your domain is correctly authenticated, it will be the See instructions link.
- Click on the Copy button to the right of Share the instructions below with the person responsible for your IT.
This is a pre-formatted email with the full instructions for your hosting provider or IT team to make the changes for you. All you have to do is paste the text into a message and send it to them.
FAQs
- Why must I authenticate my domain?
- What happens if I can't authenticate my domain right now?
- How long can I keep my temporary email address?
- Will my contacts still be able to reply to me?
- If I make the changes, does that mean my emails will no longer be classified as spam?
- Why is my email address being replaced even though I've taken steps to authenticate my domain?
Why must I authenticate my domain?
Important changes at Gmail and Yahoo now require that your sending domain is authenticated with SPF, DKIM, and DMARC. To make sure your mailings comply with these new requirements, we ask all our clients to authenticate their email domain in their account. It is important to understand that these guidelines apply to all email senders worldwide. These requirements are not specific to the use of our platform.
What happens if I can't authenticate my domain right now?
This is not a problem. Your emails will continue to be sent, but the sender address will be changed to an address automatically generated by our platform so that we can ensure that your mailings are properly authenticated and not automatically rejected or classified as spam by platforms like Gmail and Yahoo. You don't have to do a thing. We take care of everything.
How long can I keep my temporary email address?
There's no time limit at the moment. But we advise you to make changes as soon as possible. Authenticating your emails is one of today's standards. This will enable you to further personalize your mailings to your brand and establish an independent sending reputation. It also protects your organization against email spoofing.
Will my contacts still be able to reply to me?
If your domain is not authenticated in your account, this will only modify your sender address. You can continue to personalize the return address. When your recipients will press "Reply", they'll write to the address you chose in your mailing configuration.
If I make the changes, does that mean my emails will no longer be classified as spam?
As mentioned above, authenticating your domain has long been part of good mailing practice, but it has now become essential to reduce the risk of your emails being automatically blocked or classified as spam. However, even if you authenticate your domain, other factors can affect the way your emails are processed, such as the quality of your list, the content of your emails, their relevance and the frequency with which you send them. Get tips on how to improve your mailings >
Why is my email address being replaced even though I've taken steps to authenticate my domain?
In order for us to authenticate your emails with your domain, you must meet the following conditions:
- have a valid DMARC policy on your sending domain
- have created a CNAME record as described in the article above
- have notified our team that changes have been made to activate the custom DKIM signature.
If these steps have all been taken and have worked in previous mailings, but your address is being replaced again, it's because we have detected a problem with your DMARC or CNAME record. This could be due to a change in your DNS records that has affected your DMARC and/or CNAME.
If you need help, don't hesitate to contact us.
How to manage DNS records according to your provider
Below are links to help articles on how to add or modify your DNS records with the most popular domain name registrars:
GoDaddy
How to access your domain and DNS management
- Sign in to your GoDaddy's account.
- In the menu, choose My Products.
- Under All Products and Services, click on DNS to the right of the domain to be modified.
How to create a CNAME
- Click Add New Record.
- In the Type drop-down list, select CNAME.
-
Return to your account and copy the CNAME record name and value information from the DKIM section of your domain authentication instructions. Then, back in your GoDaddy account, paste them into the appropriate fields of your new record.
Don't forget to delete the website domain at the end of the record name.
- If you want changes to propagate more quickly, you can reduce the TTL to its minimum value of 600 seconds, the equivalent of 10 minutes. This is the time needed for changes to be available everywhere.
Once the changes have been detected in your account, don't forget to reset the TTL to its initial value. - Save your new CNAME record.
- If necessary, click on Continue and Verify and validate your identity to complete the creation of your new record.
How to add a DMARC record
- To add a new DMARC record, click on Add New Record in your domain's DNS management on GoDaddy.
- In the Type drop-down list, select TXT.
-
Return to your account and copy the TXT record name and value information from the DKIM section of your domain authentication instructions. Then, back in your GoDaddy account, paste them into the appropriate fields of your new record.
Don't forget to delete the website domain at the end of the record name.
- If you want changes to propagate more quickly, you can reduce the TTL to its minimum value of 600 seconds, the equivalent of 10 minutes. This is the time needed for changes to be available everywhere.
Once the changes have been detected in your account, don't forget to reset the TTL to its initial value. - Save your new CNAME record.
- If necessary, click on Continue and Verify and validate your identity to complete the creation of your new record.
Learn more about GoDaddy's DNS configurations: Add a CNAME | Setup a DMARC record
Wix
How to access your domain and DNS management
- Sign in to your Wix's account.
- In the left-hand menu, click on Settings (last option at the end).
- Click on Domains in the General settings section.
- Open the action menu to the right of the domain by clicking on the 3 small dots and select the Manage DNS records option from the menu.
How to create a CNAME
- Navigate to the CNAME (Aliases) section and click on Add Record.
- In the first field to be completed, under the Host name column, paste the name of the CNAME record you'll find in your account's domain authentication instructions.
Wix will automatically remove the domain name at the end of the copied text. You don't have to do anything. - In the second field to be completed, under the Value column, paste the text of the CNAME value that you'll also find in your account's domain authentication instructions.
-
If necessary, reduce the TTL value as low as possible so that you can see the changes quickly. This is the time needed for changes to be available everywhere.
Once the changes have been detected in your account, don't forget to reset the TTL to its initial value.
- Click Save.
- Then, if necessary, confirm the addition by clicking on Save changes.
How to add a DMARC record
- In your domain's DNS settings on Wix, navigate to the TXT (Text) section and click on Add Record.
- In the first field to be completed, under the Host name column, paste the name of the TXT record you'll find in your account's domain authentication instructions.
Wix will automatically remove the domain name at the end of the copied text. You don't have to do anything. - In the second field to be completed, under the Value column, paste the text of the TXT value that you'll also find in your account's domain authentication instructions.
-
If necessary, reduce the TTL value as low as possible so that you can see the changes quickly. This is the time needed for changes to be available everywhere.
Once the changes have been detected in your account, don't forget to reset the TTL to its initial value.
- Click Save.
- Then, if necessary, confirm the addition by clicking on Save changes.
Learn more about Wix DNS configurations: Add a CNAME | Manage your DNS records
Others DNS management platforms
- Bluehost: Add a CNAME | Setup a DMARC record
- Cloudflare: How to manage DNS records
- DreamHost: Add a CNAME | Setup a DMARC record
- HostGator: How to change your DNS records in cPanel | How to change your DNS records in Plesk
- Hover: Add a CNAME | How to create a TXT record (for DMARC)
- IONOS: Add a CNAME | Setup a DMARC record
- Namecheap: Add a CNAME (video tutorial) | Setup a DMARC record
- Siteground: Add a CNAME | Setup a DMARC record
- Squarespace: Add a CNAME | Setup a DMARC record
- Wordpress: Manage your DNS record
Glossary
What is a DMARC policy?
DMARC is an authentication method for ensuring that messages sent from your email address really do come from you, and for specifying to others how emails that fail authentication tests should be handled. Should they do nothing and accept them even if validation has failed? Should they quarantine them in the spam folder or reject them? In the last two cases, if someone tries to forge your email address, this will prevent false emails from reaching their destination and damaging your reputation in the process. DMARC also allows you to obtain detailed reports so you can detect if there have been any attempts to impersonate your domain.
What is DKIM?
DKIM is an email authentication method that allows the person or organization sending an email message to use a digital signature to associate the message with their domain. It enables the servers that receive your emails to verify that the email has indeed been sent by the domain it claims to come from, and that it has not been modified or altered in transit.
What is a CNAME?
A CNAME, or canonical name record, is a type of DNS record that maps an alias name to a true or canonical domain name.
What is DMARC alignment?
For a mailing to pass DMARC authentication checks, the e-mail must 1) be correctly authenticated with SPF authentication or a valid DKIM signature, and 2) the domain name of the address visible to recipients in the "From:" email field must be the same as the one in the Return-path email address (for SPF authentication) or DKIM signature (this is called SPF or DKIM alignment).
To ensure that your mailings via our platform pass DMARC verification, we need to add a custom DKIM signature with your sending domain in order to respect the domain alignment of your DMARC policy, as it is not currently possible to customize the domain linked to SPF verification (the one of the Return-path address). Learn more about this >
What are DNS?
DNS, or Domain Name System, are essential for directing Internet traffic. They translate domain names (such as mywebsite.com) into IP addresses, enabling emails and other data to reach the right destinations on the web. Several online tools, such as MxToolbox's DNS Check, can help you find the right tool to modify your DNS records.